
Learn how to configure virtualization, networking, clustering, backups, and workload migration to build a flexible and reliable server environment.
Modern businesses need infrastructure that can support multiple applications without constantly adding physical hardware. Whether hosting websites, business applications, databases, development environments, or internal services, organizations must balance performance, operational control, and infrastructure costs.
Proxmox Virtual Environment (Proxmox VE) provides a practical way to build a private virtualization platform on dedicated server infrastructure. It allows multiple virtual machines and containers to run on a single physical server, helping organizations consolidate workloads, simplify management, and use hardware resources more efficiently.
For small and medium-sized enterprises (SMEs), virtualization can reduce infrastructure complexity while improving flexibility. Instead of maintaining separate physical servers for every application, businesses can create isolated environments on a dedicated server and allocate resources according to their requirements.
Proxmox VE supports various workloads, including web hosting, business applications, databases, development environments, and containerized services. Running it on dedicated hardware gives organizations greater control over computing, memory, storage, and networking resources.
However, a successful deployment involves more than installing a hypervisor. Hardware selection, storage architecture, network design, backup planning, and recovery procedures all contribute to long-term reliability.
This guide covers five essential areas of a Proxmox VE deployment: installation, guest networking, clustering, backup planning, and migration from VMware ESXi.
Important: The examples and configurations in this guide are for educational purposes. Commands, network designs, storage arrangements, IP addresses, and workflows must be reviewed and adapted to the specific environment, hardware platform, and hosting provider requirements before implementation.
Prepare the Dedicated Server and Install Proxmox VE
Before installing Proxmox VE, evaluate whether the server can support your intended workloads. Virtualization performance depends on available hardware resources and how they are allocated between the host and guest operating systems.
Consider the following areas during planning:
-CPU: Ensure the processor provides sufficient cores and threads for the expected virtual machines and containers. Databases, application servers, and development environments may have different processing requirements.
- Memory: Allocate enough RAM for the Proxmox host and its guest systems. Leave additional capacity for peak utilization and future growth.
- Storage: Storage architecture affects both performance and resilience. Options include ZFS mirrors for redundancy, LVM-thin for flexible provisioning, RAID-backed configurations, and SSD or NVMe storage for workloads requiring higher storage performance. Each approach has different trade-offs involving capacity, performance, hardware utilization, and recovery complexity.
- Network connectivity: Review available network interfaces, public IP allocation requirements, VLAN requirements, and provider-specific networking restrictions.
- Remote management: Confirm whether remote management through IPMI or virtual KVM access is available for installation, troubleshooting, and recovery.
Dedicated servers give administrators direct access to physical resources and greater control over how computing, storage, and networking capacity is allocated. Hardware should be sized for current workloads while leaving room for future expansion.
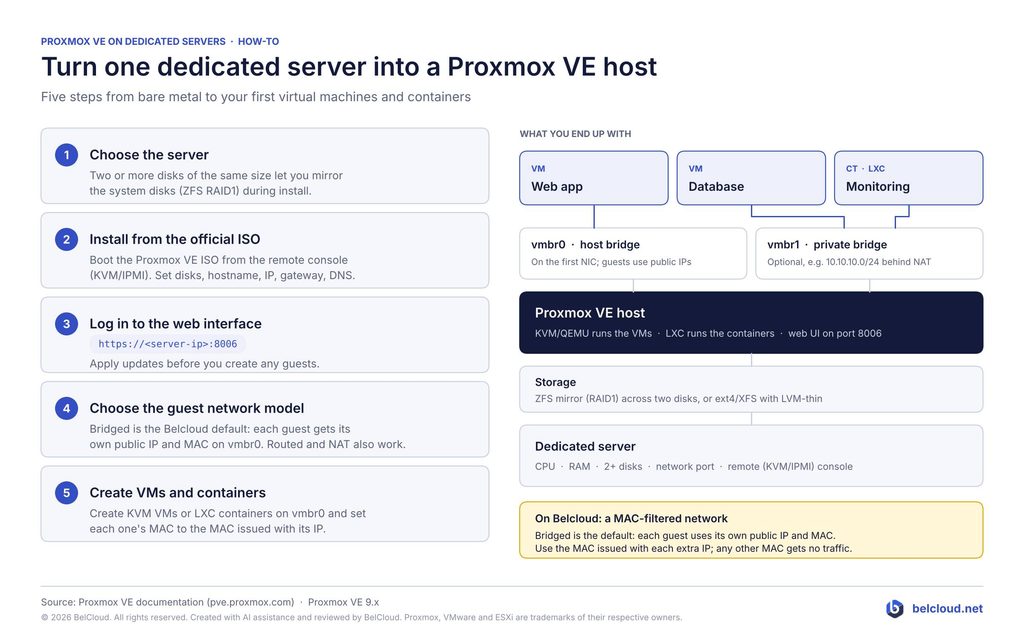
You can request Proxmox VE as the operating system during the dedicated server ordering process, where available. Alternatively, you can install it yourself using the Proxmox VE installation ISO through the server’s remote management console.
After installation, access the management interface using the following address:
Apply the appropriate updates and validate connectivity before deploying production workloads.
Diagram 1: Turn One Dedicated Server Into a Proxmox VE Host
Choose the Right Networking Model for Your Guests
Networking is one of the most important design decisions in a Proxmox VE deployment. The appropriate configuration depends on public IP requirements, application exposure, security policies, internal communication needs, and hosting provider capabilities.
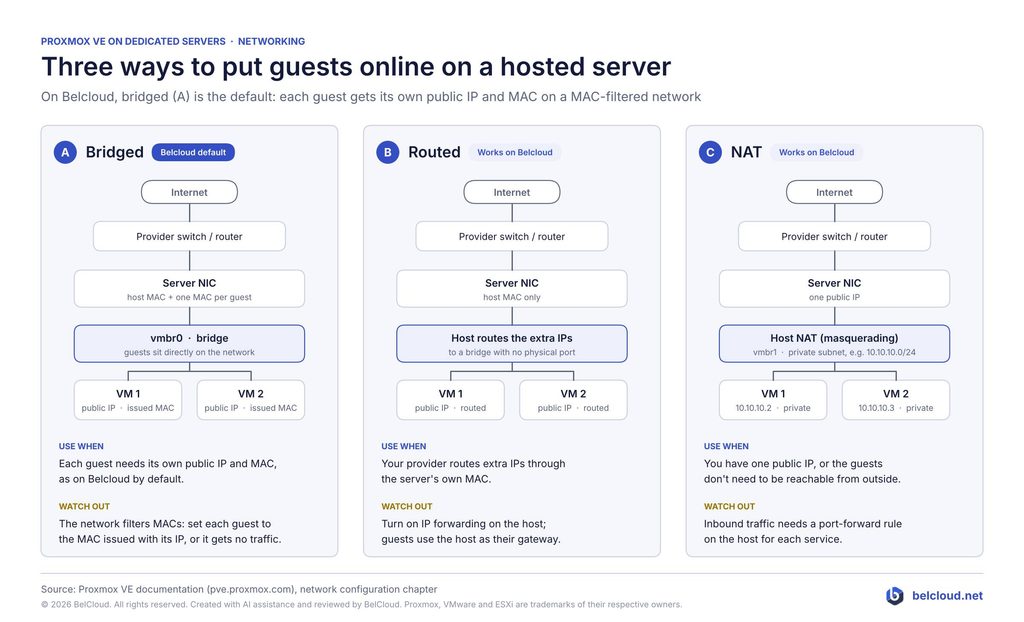
Three common approaches are bridged networking, routed networking, and network address translation (NAT).
Bridged Networking
A Linux bridge, such as vmbr0, connects guest systems to a network through the host’s physical network interface. Virtual machines can communicate through the network as individual devices.
Common use cases include public-facing web servers, mail servers, load balancers, and applications that require a direct network presence.
Before assigning public IP addresses to virtual machines, review your hosting provider’s requirements. Providers may use routed subnets, Layer 2 bridging, VLANs, or other network delivery models.
Routed Networking
Routed networking allows the host to direct traffic to virtual machines over an internal virtual network.
Potential advantages include improved segmentation, reduced Layer 2 complexity, and greater control over traffic flows. This approach can be useful when managing multiple IP addresses or designing more structured network environments.
Correct routing rules, IP forwarding, and guest gateway settings are essential for connectivity.
NAT Networking
Network address translation allows multiple guest systems to share the host’s public IP address. Guests use private IP addresses, while the host translates their traffic for outbound communication.
NAT can be suitable for internal applications, testing environments, development systems, and containerized services. Applications that require inbound connections may need additional port-forwarding or firewall rules.
Working With Dedicated Infrastructure
Proxmox VE deployments may also use supporting network services such as public IP addressing, private VLANs, routing, and load balancing. These capabilities can help businesses build more flexible and secure environments for production applications and multi-tier services.
Diagram 2: Three Ways to Connect Virtual Machines to External Networks
Scale Beyond One Server With a Proxmox VE Cluster
A single dedicated server can support multiple business workloads. As requirements grow, organizations may need additional computing capacity, redundancy, or greater operational flexibility.
Proxmox VE clustering allows multiple hosts to be managed through a unified platform. Depending on the architecture, a cluster can support centralized administration, resource management, live migration, and high-availability configurations.
Plan the Cluster Network
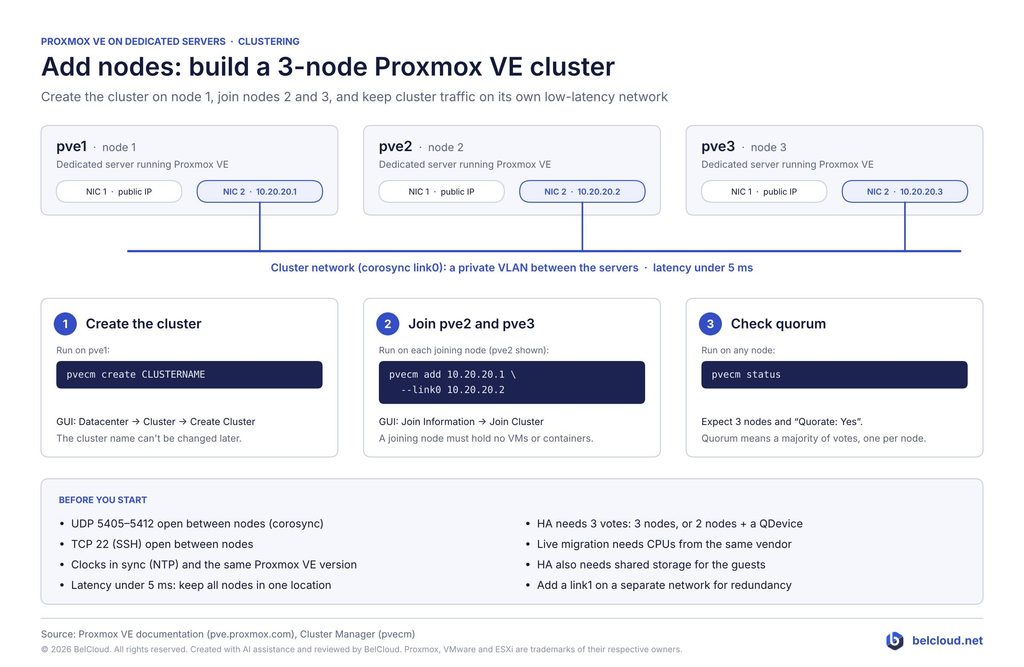
A common architecture uses separate interfaces for public application traffic and private cluster communication. Separating these traffic types can improve predictability and help reduce operational risks.
When designing cluster connectivity, consider:
- Network latency and packet loss
- Available bandwidth
- Network redundancy
- Node-to-node communication
- Failure detection and recovery mechanisms
Create and Join Cluster Nodes
A typical deployment involves:
- Installing compatible Proxmox VE versions on all servers.
- Configuring networking.
- Validating connectivity between nodes.
- Creating the cluster on the initial node.
- Joining additional nodes.
- Verifying quorum and overall cluster health.
The accompanying diagram may include example pvecm commands and cluster creation workflows. Always confirm command syntax and prerequisites against the official documentation for your installed version.
Understand High-Availability Requirements
A cluster does not automatically provide high availability. The design must account for quorum, shared or replicated storage, sufficient host capacity, failure detection, and recovery procedures.
A three-node architecture can provide a stronger quorum foundation than a two-node deployment. However, high availability still requires careful configuration and testing. Live migration and failover capabilities must also be validated before production use.
Diagram 3: Build a Three-Node Proxmox VE Cluster
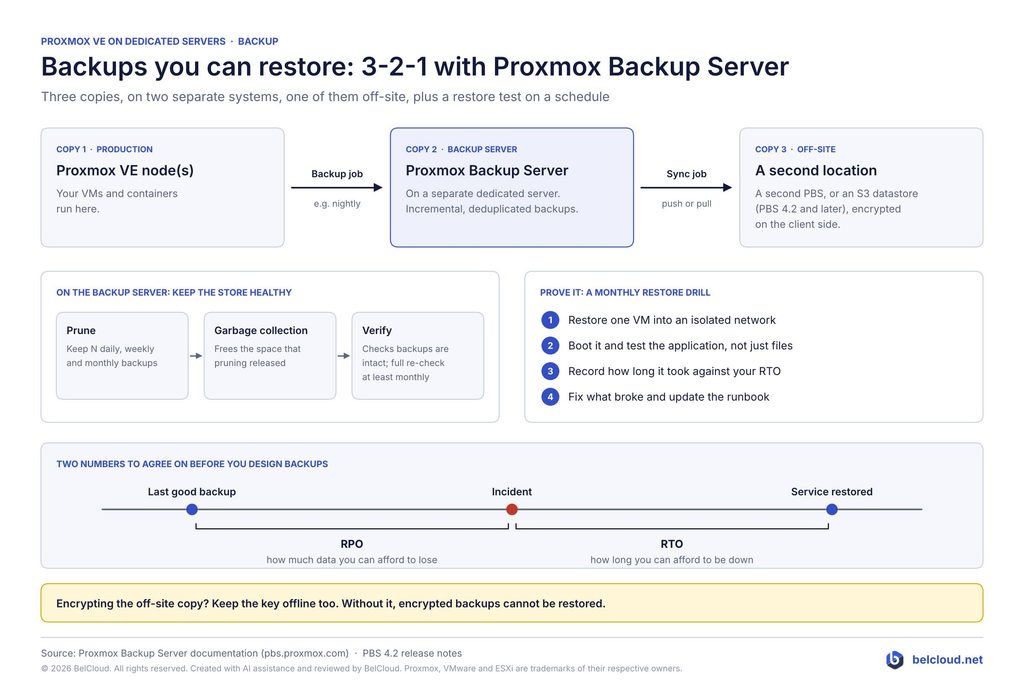
Build a Backup Strategy You Can Actually Restore
Virtualization simplifies server management, but it does not eliminate the risk of data loss.
Hardware failures, human error, software corruption, security incidents, misconfiguration, and accidental deletion can all affect production systems. A backup strategy should therefore reflect business recovery requirements rather than storage capacity alone.
Apply the 3-2-1 Backup Principle
The 3-2-1 methodology recommends maintaining three copies of important data, using two different storage systems or media types, with one copy stored off-site.
An example Proxmox VE implementation could include:
- Copy 1: Production workloads running on the Proxmox host.
- Copy 2: Backups stored on a separate Proxmox Backup Server.
- Copy 3: An additional off-site copy held at another backup location or on a compatible object storage platform.
Proxmox Backup Server supports incremental backups, deduplication, encryption, and retention management. These features can help improve backup efficiency and manage storage consumption.
Monitor and Test Recovery
A completed backup job does not guarantee successful recovery. Organizations should review backup reports, monitor storage utilization, verify retention policies, investigate failed jobs, and conduct periodic restore tests.
Restore validation helps confirm whether data and applications can actually be recovered when needed.
Define Recovery Objectives
Two important metrics help businesses plan their recovery strategy:
- Recovery Point Objective (RPO): Defines the maximum acceptable amount of data loss, measured in time.
- Recovery Time Objective (RTO): Defines the target time for restoring services after an interruption.
These objectives influence backup frequency, storage design, infrastructure requirements, recovery procedures, and staffing needs.
Diagram 4: Build a Recoverable Backup Strategy With Proxmox Backup Server
Plan a Migration From VMware ESXi to Proxmox VE
Organizations evaluating Proxmox VE may also be considering a move from VMware-based virtualization platforms. Such a migration should be treated as a structured infrastructure project rather than a simple virtual machine conversion.
The goal is to preserve application functionality, data integrity, security controls, network connectivity, and acceptable service availability.
Start With an Inventory and Rollback Plan
Before migrating workloads, document virtual machine configurations, dependencies, network requirements, storage consumption, backup availability, and recovery procedures.
A tested rollback plan is an important safeguard if the migration encounters unexpected problems.
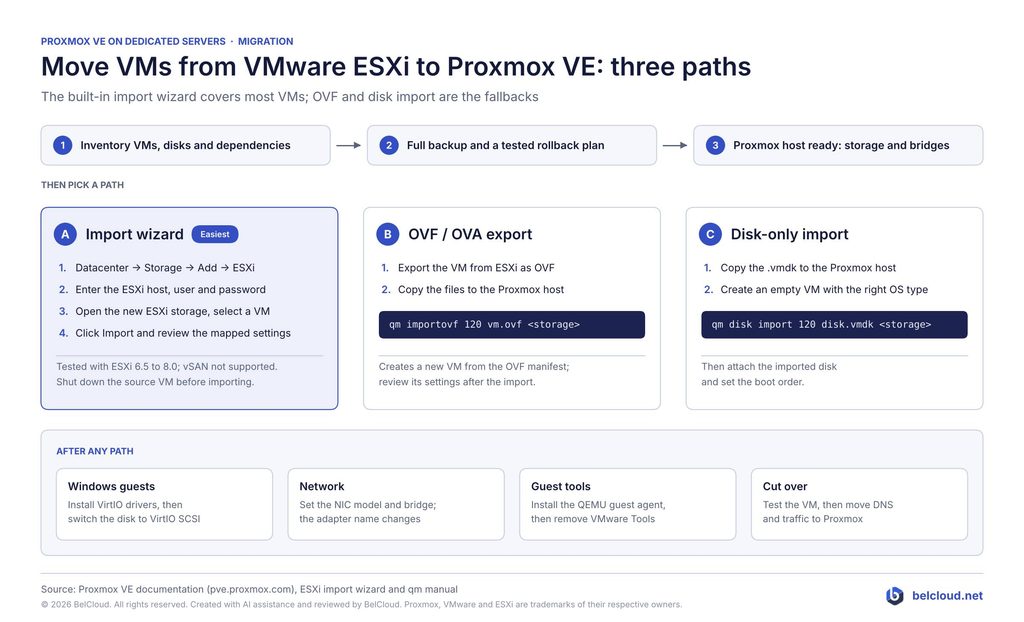
Choose the Appropriate Migration Method
The right approach depends on the source environment, workload requirements, storage architecture, and Proxmox VE version.
Option A: ESXi Import Wizard
Proxmox VE provides import capabilities that can connect to supported VMware environments and migrate selected virtual machines. Administrators should verify compatibility, storage access, credentials, supported versions, and documented limitations.
Option B: OVF or OVA Export
Virtual machines can be exported in supported package formats and then imported into Proxmox VE. This method may be appropriate for smaller migrations or individual workloads. The imported configuration should be reviewed before use.
Option C: Virtual Disk Import
Virtual disks can be imported into Proxmox VE and attached to newly created virtual machines. Tools such as qm disk import may be used in supported migration workflows.
The target virtual machine must be configured with the appropriate disk attachment, controller, and boot settings.
These methods are not interchangeable in every environment. Select the approach that best matches the source configuration and the current official migration guidance.
Validate Before Production Cutover
After migration, verify guest operating systems, application functionality, network connectivity, storage performance, monitoring integrations, and backup coverage.
Windows-based workloads may require additional VirtIO driver validation, depending on the migration method and configuration.
Redirect production traffic only after the necessary validation steps have been completed and the rollback plan remains available.
Diagram 5: Migrate Virtual Machines From VMware ESXi to Proxmox VE
How Belcloud Supports Proxmox VE Deployments
Proxmox VE can be deployed on dedicated server infrastructure, giving organizations control over the physical resources that support their virtualized workloads.
Businesses running databases, web hosting platforms, internal applications, development environments, and resource-intensive services may benefit from predictable resource availability and infrastructure-level configuration control.
Belcloud’s dedicated servers can serve as a foundation for Proxmox VE deployments, from single-server virtualization environments to larger multi-node infrastructures. Organizations can create and manage virtual machines and containers while configuring computing, storage, and networking resources according to their requirements.
Depending on the project, supporting network services such as public IP addressing, private VLANs, routing, and load balancing may also form part of the design.
When planning a deployment, businesses should:
- Consolidate suitable workloads to improve hardware utilization.
- Allocate CPU, RAM, and storage according to application requirements.
- Design networks around connectivity and security needs.
- Establish clear recovery objectives and test backups regularly.
- Plan for future capacity and availability requirements.
- Validate migrations before moving production traffic.
- Document operational procedures for consistent management.
For organizations seeking a private virtualization platform, dedicated servers provide a flexible foundation for building and managing infrastructure around specific business needs.
Final Thoughts: Build Reliability First, Then Scale
Proxmox VE provides a flexible platform for running virtual machines and containers on dedicated infrastructure. However, successful virtualization depends on more than the initial installation.
Hardware planning, storage architecture, network design, backup procedures, recovery testing, and operational discipline all contribute to long-term reliability.
Businesses should begin with clearly defined workload requirements, performance goals, and recovery objectives. They can then build an environment that balances flexibility, scalability, and operational simplicity.
For organizations evaluating Proxmox VE, dedicated servers offer direct access to physical hardware resources and greater control over infrastructure configuration. This makes them worth considering for virtualization, databases, and other resource-intensive applications.
Explore Belcloud’s dedicated server solutions at https://www.belcloud.net/.
Example commands, addresses, storage layouts, and network models may require modification or may not apply to every environment. Proxmox VE features and supported workflows can change between releases. Always consult the current official documentation and test changes in a suitable environment before applying them to production systems.
Belcloud’s support engineers can assist with initial OS provisioning and troubleshooting. However, having a team member with virtualization knowledge is essential for managing and maintaining the environment.
Proxmox, VMware ESXi, and all other product names, trademarks, and logos mentioned are the property of their respective owners. Belcloud is not affiliated with, endorsed by, or sponsored by Proxmox or VMware. This content is intended as a practical reference and should not be considered official documentation. Always consult the respective vendors’ documentation before implementing configurations or making changes to your infrastructure.
Official Documentation
- Proxmox VE: https://pve.proxmox.com/pve-docs/
- Proxmox Backup Server: https://pbs.proxmox.com/docs/